
Lukkarikone instructions
Lead paragraph
In Lukkarikone, you can view the implementations’ schedules and the timetables of different groups, as well as build your own timetables. You can view the study offering without logging in, but you need to log in to create your own timetables and to edit them.
1. Current Events
On the Current Events tab, you can see the calendar reservations you have for the day. You can move to the next day by clicking the Next button.
2. Calendar
2.1. The calendar view
Clicking the Calendar button in the upper left corner of the page will take you to the calendar view where you can see your weekly reservations. In the weekly view, weekdays from Monday to Friday are shown. Weekends are shown if there are reservations for them. You can switch the calendar view to a monthly, weekly, or daily calendar by selecting one of the buttons on the right side above the calendar.

2.2. Viewing reservation details
1. In the calendar view, click on the reservation about which you want more information.
2. Select Show implementation details.
3. If you want to hide the reservation from the calendar view, select Hide reservation.
3. Building a timetable
3.1. Automatic schedule
When you log in to Lukkarikone for the first time, an automatic schedule is created based on the implementations that you have enrolled for. The automatic schedule cannot be edited.

To view the automatic schedule, select Automatic schedule from the Schedule drop-down menu in the center of the top navigation bar.
You can see the contents of a timetable by clicking on the Index button on the top navigation bar.
3.2. Searching for implementations and adding them to your timetable
NOTE! Implementations cannot be added to the automatic schedule. You can only edit the timetables that you have created.
1. Select Calendar > Implementation search.

2. From the drop-down menu, select the criteria by which you want to search for implementations:
- Name or ID
- Teacher name (only for logged-in users)
- Group ID
TIP: The easiest way to search for implementations is to use your group's ID as the search criteria. You can also search for implementations by the group ID of the implementation type (see 3.3. Implementation types).

3. Enter part of an implementation's name or ID / a teacher's name / a group ID (minimum 3 characters) in the field.
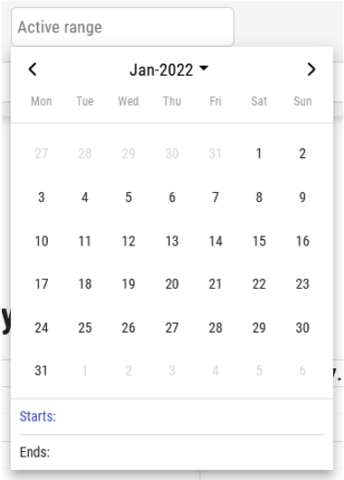
4. If you want to search for implementations that are active for a certain period of time, you can set the time period in the Active range field. Select the start date first, and then select the end date.
5. Click on the Search button.
6. You can filter the search results from the drop-down menus above the results (Languages, Locations, Study begins, Study Types, Degree Programmes).

You can see more information about an implementation by clicking on the Info button next to it.

7. Add an implementation to your timetable by clicking on the Add button next to it.
3.3. Implementation types
You can also search for implementations by implementation type. Use the Implementation search and choose Group ID as the search criteria.
There are six alternative implementation types indicated with the following group IDs: CONTACT, ONLINE, VIRTUAL, DEMO, WORKSTUDY and EXAM. Additionally, there are six additional codes. These are indicated with group IDs as well. Additional codes BLENDED, EVENING, WEEKEND and INTENSIVE give more information about CONTACT and ONLINE implementations. Additional codes NONSTOP and INSTRUCTED describe the type of a VIRTUAL implementation.
When you want to search for implementations by the implementation type, use the following group IDs:
- Implementation types
- CONTACT is for implementations with in-person sessions. In contact implementations, the teacher and the students are mainly on campus at a specifically scheduled time (daytime, in the evening, weekends or intensive week). There can also be material and assignments online. Possible exams are organised either on campus or online, usually at the specifically scheduled time as stated in the implementation plan. It is recommended, that students get connection with the teacher within two working days. (Possible additional codes: BLENDED, EVENING, WEEKEND and INTENSIVE.)
- ONLINE is for implementations conducted only through virtual learning environments. The implementation includes scheduled online studies (e.g. lectures, group work), and the material and the assignments are found online. The assignments have common deadlines and the possible exams are organised online at a time stated in the implementation plan. It is recommended, that students get connection with the teacher within two working days. (Possible additional codes: BLENDED, EVENING, WEEKEND and INTENSIVE.)
- VIRTUAL – An implementation where the student learns completely independently by carrying out mainly automated tasks in an e-learning environment according to their own schedule. There are no scheduled classes or other online meetings. Students can communicate with each other and the teacher of the implementation through a discussion platform. It is recommended that students are able to contact the teacher within five working days. Any exams and retakes will be flexibly organised online. (Possible additional codes: NONSTOP and INSTRUCTED.)
- DEMO – An implementation where prior learning is shown through demonstration.
- WORKSTUDY – An implementation where students gain skills by working and by connecting practical work with a theme-related knowledge base. At the end of the implementation, the learning is shown through demonstration.
- EXAM – An implementation that does not include teaching or guidance, but the student completes the course in its entirety in an exam. The preliminary materials are indicated in the course description.
-
Additional codes
- BLENDED – In addition to the actual implementation method, there are also online studies and/or independent virtual studies in an e-learning environment. For more information, please refer to the implementation plan.
- EVENING – teaching starts after 4PM
- WEEKEND – all teaching is on weekends
- INTENSIVE – all teaching is during the intensive weeks
- NONSTOP – An implementation that students can complete at their own pace during the course of the implementation. The teacher accepts the new enrolments at least once a week, and for the last time, two weeks before the end of the implementation. The teacher gives an assessment to a student in Peppi as the student completes the implementation. It is recommended that students are able to contact the teacher within five working days. Any exams and retakes will be flexibly organised online.
- INSTRUCTED – A instructed virtual implementation in which the student completes tasks in an e-learning environment according to their own schedule. There are no scheduled classes or other online meetings. The student may choose to participate in guidance and feedback sessions provided by the teacher. In addition, students can communicate with each other and with the teacher of the implementation through a discussion platform. It is recommended that students are able to contact the teacher within five working days. The possible exam and retake will be flexibly organised online.
- Other codes
- EXCH – EXCH is added to implementations for exchange students.
- SUMMER (former KESÄXXXX) – Starting from the summer 2024, SUMMER is added to implementations starting during the summer.
3.4. Overlaps
If an implementation in the search results has one or more calendar reservations overlapping with an implementation you have already added to your timetable, a red bar will appear next to it in the search results.
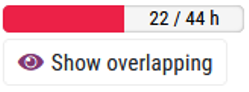
The red bar shows how many of the implementation's lessons overlap with the lessons of the implementations already in your timetable. For more information on the overlaps, select Show overlaps. In the window that opens, you can see the names and dates of the overlaps, as well as their exact durations.
3.5. Filling the free periods
If there are free periods on your timetable that you want to fill, use the Free period search.
1. Select Calendar.
2. Click on an empty slot in the calendar or paint the free period using your mouse. Free period search window opens.

3. You can filter the search by the start time and the duration of the free period, as well as by place.
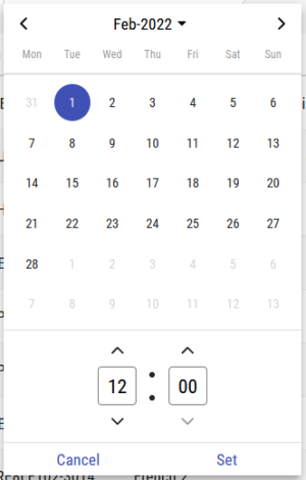
4. To edit the date and start time of the free period, click on the Time field.
5. Add an implementation to your timetable by clicking on the Add button next to it.
3.6. Searching for the reservations of a group or a room
1. Select Calendar > Group search / Location search.
2. Enter a part of a group's / a room's name or ID (minimum 3 characters) in the field.
3. Click on the Search button.
4. Add a group's / a room's reservations to your timetable by clicking on the Add button next to it.
3.7. Adding events to your timetable
NOTE! You can only add events to timetables that you have created yourself.
1. Go to the Calendar Admin view. Under the Index heading, you can see all the implementations', groups', and rooms' schedules added to the timetable you have selected.
2. Click on the + button above the index and select the events you want to add to your timetable. All the calendar reservations of the events you select will be added to your timetable and can be seen on the index.
3.8. Removing implementations, groups and rooms from your timetable
NOTE! Lukkarikone does not ask for confirmation whether you are sure that you want to remove an item from your timetable.
1. Click on the Index button on the top navigation bar.
2. Under the Basket content heading, you can see all the implementations', groups', and rooms' schedules added to the timetable you have selected.
3. You can remove an item from your timetable by clicking on the trash can icon next to it.
4. Calendar Admin view
4.1. Opening the Calendar Admin view
1. Log in to Lukkarikone.
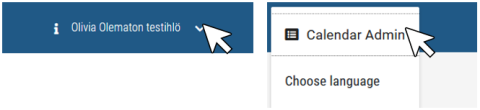
2. Click on the arrow button next to your name in the upper-right corner of the page.
3. Select Calendar Admin from the drop-down menu.
4.2. Creating a new timetable
1. Go to the Calendar Admin view.
2. Under the Calendars heading, select Add new calendar.
3. New calendar window opens. Enter a name for the new timetable and select Save.
4.3. Changing a timetable's name
1. Go to the Calendar Admin view.
2. Click on the arrow button next to a timetable's name and select Edit.
3. Enter a new name for the timetable and select Save.
4.4. Adding notes to a timetable
You can add notes to a timetable. The notes are shown only in the timetable, to which you add them. Notes cannot be edited afterwards.
1. Go to the Calendar Admin view.
2. Click on the note icon next to a timetable's name.
3. Select Create new note.
4. Write the note and select Save.
4.5. Viewing and deleting notes
1. Go to the Calendar Admin view.
2. Click on the note icon next to a timetable's name. The number on the icon indicates the number of notes.
3. If you want to delete a note, click on the trash can icon.
NOTE! Lukkarikone does not ask for confirmation whether you are sure that you want to delete a note.
4.6. Choosing the default schedule
The default schedule opens automatically when you log in to Lukkarikone.
1. Go to the Calendar Admin view.
2. Click on the arrow button next to a timetable's name and select Choose as default schedule.
4.7. Sharing a calendar link
You can synchronise your calendar with your Google or iCloud calendar.
1. Select Index from the top navigation bar. Then, select Share Calendar.
2. Copy the link and add it to your Google or iCloud calendar.
3. If you want to stop synchronising the calendars, select Remove Calendar Share.
4.8. Deleting a timetable
NOTE! Lukkarikone does not ask for confirmation whether you are sure that you want to delete a timetable. You cannot delete the automatic schedule, the default schedule or the timetable that is currently open. You can see which one of your timetables is currently open on the Schedule field on top of the page.
1. Go to the Calendar Admin view.
2. Click on the arrow button next to a timetable's name and select Delete.
Link to Lukkarikone: https://lukkarit.haaga-helia.fi/